PowerPoint 2013: Basic Skills
PowerPoint 2013: Basic Skills
Getting Started
There are a variety of ways to start using PowerPoint software. You can click on a shortcut on your desktop or task bar or you can double-click on a PowerPoint file. You can click on Start > All Programs > Microsoft Office > PowerPoint. In Windows 7, you can click on the Start orb and start typing PowerPoint in the search box in the lower left corner then select PowerPoint from the list of choices that appears.
You will see a new blank presentation and its title slide:
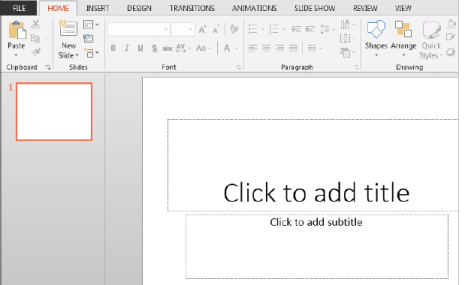
This is normal view with the slide area where you can enter text and insert images, an area below the slide where you can enter speaker notes, a slide sorted with thumbnails on the left, and a tab that you can click to switch to outline view.
Across the top you have the ribbon, where each tab will display a different collection of command buttons. The Home tab has the most frequently used commands. You can minimize the ribbon by double clicking on a tab name or by
clicking on the ^ button to the left of the Help button. Expand the ribbon by double clicking on a tab name or by clicking on the v button that replaced the ^ button.
If a command has a next to it, you will have additional choices when you click on it.
In the bottom right corner of a group of commands on the ribbon, there is frequently a dialog box launch button. Click on this button to modify several characteristics at once. If you are familiar with earlier PowerPoint versions, you will recognize most of these dialogs.
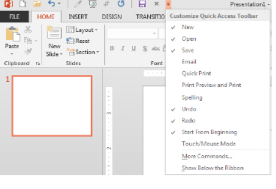
The title bar also has the Quick Access toolbar where you can add favorite commands.
Click on the Customize Quick Access Toolbar button to add commands or to display the toolbar below the ribbon.
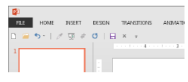
Minimized ribbon with Quick Access toolbar displayed below the ribbon:
Create a New Presentation from Template
- Click on the File tab.
- Click on New
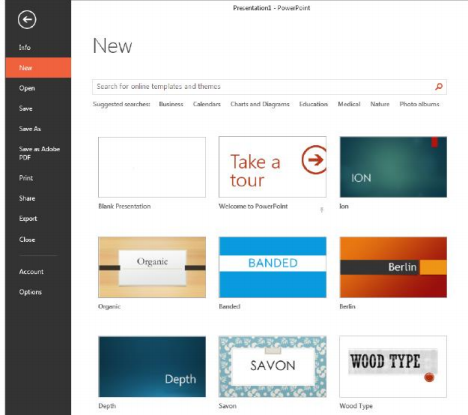
If you wish, click on Blank Presentation or one of the themes and continue.
3. Alternatively, you can choose to search for a presentation template online:
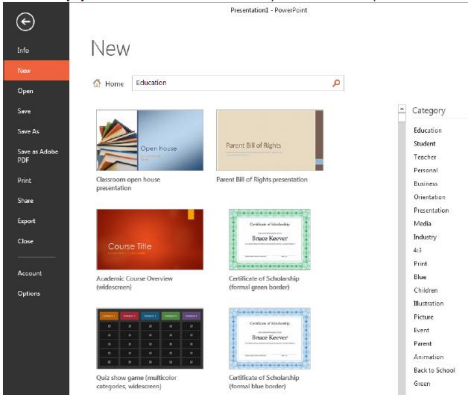
4. Click on the one you want to use then click on the Create button –or double click on the template of choice.
In addition to sample templates, you can create your own custom templates, use one of your existing presentations as a template, or you can search for one on microsoft.com.
Opening an Existing Presentation
You can double click on a PowerPoint file on your computer or USB drive. You can click on the Open button on your Quick Access Toolbar or press Ctrl O. You can click on File and choose Open then search for the file.
You can click on File and Open then choose Recent Presentations and pick from the list:
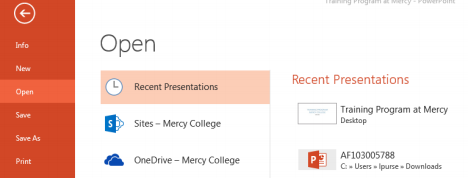
You can “pin” one or more documents to the list of Recent Presentations by clicking on the gray pushpin icon to the right of the file name. No matter how many files you open, pinned items will be listed at the top. Likewise, you can pin a recently accessed folder in the Recent Places column that you plan to use frequently.
Create a Title Slide
When you first start a new presentation, you are working with the title slide layout.

1. Click in each box as indicated. When you click there, the box border changes, a blinking cursor appears in the box and your mouse pointer becomes an I-bar.
2. Type your text and click outside the box to indicate that you are finished. The text box will disappear, leaving only your text.
Save Your File
- Go to the File menu and select Save.
- Select a location in the Save In: box.
- Supply a name next to the File name box.
Editing Text
Select the text box
Click once on top of type text. A frame of tiny dashed lines will appear, along with small square buttons on the sides and corners. You will see a rotate handle at the top.
Move the text box
Click anywhere on the edge of the frame.
When you see a 4-headed arrow, you can drag & drop the text box in its new location.
Resize the text box
Click on the frame. Click one of the small square buttons embedded in the frame. When you see a double-headed arrow, drag and drop to desired size. Release the mouse button when the text box is in the desired size.
Rotate the Text box
You can click on the small rotate handle and rotate the text box to a new angle
Change the alignment
Select the text in the box (or click on the text box frame) and choose Left, Right, Center, or Justify from the Paragraph group on the Home tab.
Format the text
Select the text box and roll the mouse over the text to select it.
- ∙ Change the font using the Font dialog box or click on the down triangle next to the font name on the Home tab and select a new font.
- ∙ Change the font size using the Font dialog box or the big A/ little A buttons or click on the down triangle next to font size on the Home tab and select a new point size.
- ∙ Change the text color.
Inserting a New Slide
1. Go to the Home tab and click on the New Slide command
2. If you click on the top half of the button, you will get the “title & content” slide if it will be the first new slide after the title slide. Otherwise, it will insert a new slide with same layout as the slide you are currently clicked on.
3. If you click on the bottom half, you will have a selection of slide layouts to select from.
Create a Bulleted List Slide
1. Start a new slide and choose a layout that includes bulleted text.
2. Click in the body of the slide and enter your text where indicated.
3. Each time you press enter, you will see a new bullet at the beginning of the one.
4. If you have subordinate items, press the tab key to indent before typing. Subordinate items usually have a different bullet.
5. Create a title for the slide.
6. You will end up with something like:
Topics
Change the Bullet
1. Position the cursor in front of the text where you want to change the bullet or highlight several items to change several bullets at once.
2. Then click on the Bullets button under the Home tab.
3. You can select one of the popular or recently used bullet types.
4. Alternatively, you can click on the Bullets and Numbering command below the bullets to select a bullet from another font or to control the bullet size or color. Click OK after you make your decisions.
Bullet Tab and Indentation Settings
1. Make sure you are in slide view (View > Normal).
2. If the rules isn’t displayed, choose Ruler from the View tab.
3. Highlight the text for which you want to adjust the tab and/or indentation settings.
4. Look at the ruler.
5. Click on the triangle that is pointing upward and drag it to change the space between a bullet and text.
6. Click on the square and drag it move both the bullets and text.
Alternatively, click on the dialog box launch button in the Paragraph group and adjust the hanging indent value.
Changing Paragraph Spacing
1. Go to a slide with a text box or bulleted text.
2. Click on the text to select the frame or select only the items of interest.
3. Go to the Home tab and select a line spacing or click on Line Spacing Options.
4. You can change the line spacing within paragraphs or between paragraphs. Click OK when done.
Choosing line Spacing Options is the same as launching the Paragraph format dialog:
Editing the Master Slides
1. Go to the View tab then click on Slide Master. You will see
2. Make changes to the master slide:
A. You can reposition and resize items on the screen such as any text boxes, date area, slide number, footer area, etc.
B. You can change the font choice, text size, text color, bullet format, and text alignment of any text boxes.
C. You can change the indent settings using the ruler.
D. You can change the paragraph spacing.
E. You can add images to the master slide that will appear on every slide (e.g. a logo or clipart.)
3. Click on a different slide type from the list on the left and repeat steps a-e.
4. When you are done, click on Close Master View on the Slide Master Toolbar or click on the View tab and select Normal.
Change the Presentation Design
1. Click on the Design tab.
2. Choose one of the available themes. You will see a live preview on your current slide.
3. You can click on the button to see another tow of themes to choose from.
4. You can click on the below the button to see all available themes at once.
5. You can choose a Variant of a theme from the list on the right.
6. You can browse for themes in other folders on your computer or you can download new themes from microsoft.com.
7. When you mouse over one of the theme thumbnails, you will see a live preview, if you are showing all themes, they might hide your slide.
8. Click on the desired theme to select it.
Change Color Theme
1. Click on the Design tab
2. Click on the More button in the bottom right corner of the Variants group:
3. Click on the Colors command.
4. To customize a color theme, click the Customize Colors command below the list of existing schemes.
5. You can change the colors of properties such as the background, hyperlinks, and accents. Click next to each item and select a new color. You will see the changes you select in the sample thumbnail image.
6. Give your theme a name, otherwise it will be named Custom 1 or Custom 2, etc.
7. Click Save to incorporate your changes.
8. You will be able to use this color theme in other presentations.
Insert Images
Add a Picture
1. Go to the Insert tab and select Pictures
Or click on the Pictures button on a content slide.
2. Look in the subdirectory where you have placed your image files. 3. Insert the graphic file: click once on the file name and click on the Insert button.
You can move, resize, crop, rotate, and delete your image. You can recolor the image or apply artistic effect and/or corrections.
Insert Smart Art
Smart Art makes it easy to add shapes to demonstrate a list, process, or relationship. You can insert text or images into the shapes.
Views in PowerPoint
Normal View
Includes a Slide Sorter on the left and an area to enter slide notes at the bottom (the font will always appear tiny here). You can select text and change its formatting but the formatting will not appear in Normal view.
You can change how much room is in each of the 3 sections by positioning the cursor over the dividing line until you see a double-headed arrow; drag and drop to the desired section size.
You can preview your notes by going to the View tab and selecting Notes Page.
Outline View
You can use Outline view to navigate between slides, to add more text, to copy in text from other applications, to rearrange bullet items.
Choose Outline View from the View tab.
Slide Sorter View
1. Choose Slide Sorter from the View tab
Or click on the Slide Sorter button in the bottom right corner.
You will see several thumbnails of your slides.
2. Rearrange the order of your slides: drag and drop a slide to a new position. The slide will be inserted to the right of the vertical gray line.
3. Select a slide by clicking once on it.
4. Edit an individual slide by double clicking on it. You will switch to View. Slide Management
Make a copy of a slide (you can do this task in Slide view or after selecting a slide in slide sorter view)
1. Go to the Home tab
2. Click on the bottom half of the New Slide button
3. Select Duplicate Selected Slides
Delete a Slide
Click on a slide once in Slide Sorter view or in the Slides area on the left in Normal view to select it and press the Delete key.
Animations
Click on the text box or image to select what you want to animate. Click on the Animations tab and select an effect.
You can click on the Animation Pane to choose more options for your animation.
Transitions
The transition is the special effect that take place when you move to the next slide. Click on the Transitions tab to choose an effect. You can preview your choice.
Set Up Slide Show
Click on the Slide Show tab
Click on Set Up Slide Show
Make your desired selections and click OK.
Display your Slide Show
1. Go to the Slide Show tab and select From Beginning or From Current Slide.
2. Press enter or click the left mouse button to advance to the next slide.
3. If you want to stop early for any reason, press the Escape Key.
You can switch the mouse cursor from arrow to a pen to markup your screen. It is easier to memorize Ctrl A (arrow) & Ctrl P (pen) to control
this feature instead of using the command box in the lower left of the slide screen (you will need access to the keyboard).
You can black out your screen temporarily by pressing the letter B. To return to the current slide, press the letter B again.
Navigation between slides
Keyboard keys to move from one slide to another
PageUp & PageDown (previous & next)
Backspace & Enter (previous & next)
The P & N keys (previous & next)
Printing Slides
1. Go to the File menu and select Print.
2. Slides: Choose all, a range of slide numbers, a series of slide numbers, or the current slide.
3. You can choose whether to print only one slide per page, notes pages, the outline, or handouts with multiple slides per page.
4. When using a black & white laser printer, select pure black and white or grayscale. If you do have a color printer, you might want to choose a design template or color scheme with a white background to save on toner or ink.