Word 2013 Formatting Text and Using Styles
Word 2013 Formatting Text and Using Styles
Paragraph Format Options
To specify paragraph formatting options, click the dialog launcher of a Paragraph group under the Home or the Page Layout tab to bring up the Paragraph dialog box or right click in your text and choose Paragraph from the shortcut menu.
<< dialog launcher
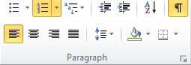
Paragraph group under the Home tab
You can set the alignment, change the indentation of a paragraph, and set the line spacing. Use Spacing Before or Spacing After to control spacing between paragraphs instead of using two hard returns between paragraphs.
Click on the Set as Default button to use this paragraph formatting in future normal documents.
First Line Indent
Instead of pressing the tab key or the space bar 5 times, use a first line indent. 1. To accomplish this, go to the Home or Page Layout tab 2. Click on the Paragraph dialog launcher.
3. Click on the Indents and Spacing tab.
4. In the Indentation section, click on the down triangle under Special and select First Line
5. Specify how far you want the first line indented; the current value is probably set to “(none)”.
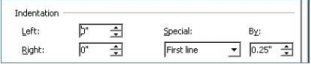
This paragraph format will stay in effect for the rest of your paragraphs from this point on.
Hanging Indent
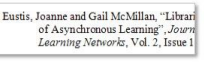
A hanging indent is where the first line of the paragraph touches the left margin but subsequent lines are indented. You often might choose to create hanging indents for a list of references or bibliography at the end of your document or for a glossary.
1. Click on the Paragraph dialog launcher from the Home or Page Layout tab (or right click on the paragraph and choose Paragraph).
2. Click on the Indents and Spacing tab if it is not on top.
1. Click on the Indents and Spacing tab.
2. In the Indentation section, click on the down triangle under Special.
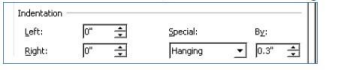
3. Select Hanging and specify how far you want the subsequent lines indented. This paragraph format will stay in effect for the rest of your entries. If you have already typed or created your list of references, select all of the entries first and then apply this formatting.
Setting Tabs
An easy way to set or modify tab settings is from the Tabs button on the Format Paragraph dialog.
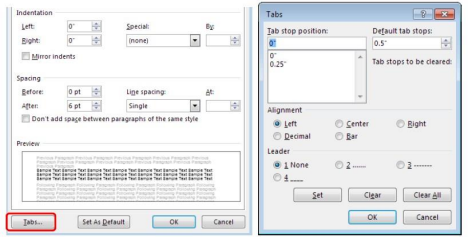
1. Bring up the Paragraph dialog.
2. Click on the Tabs button.
3. Clear existing tabs if you need to.
4. Enter a tab stop position in inches.
5. Choose the desired alignment: left, right, center, decimal point
6. Choose a leader if you wish (e.g., periods or an underscore)
7. Click on the Set button.
8. When done setting all desired tabs, click on OK.
Page Setup
Bring up this dialog from the Page Layout tab.

Margins tab
.
You can change the page orientation for the whole document or just for this point forward. If you select “this point forward”, Word will insert a Next Page Section Break. When you want to switch back to the previous orientation, return to this dialog and pick the desired orientation for this point forward again. The alternative is to manually create sections ahead of time and then pick the desired orientation for each section.
Layout tab
Headers and footers: you can set a different first page and/or different odd and even pages.
Line Numbers: You can number each line of the document (useful for legal documents and scripts) and those line numbers can start over on each page or section or run continuously through the document.
Borders: you can set a border for every page in the document, for just this section, for the first page of this section, or for every page except for the first page.
Sections
Section breaks are essential for large complicated documents, especially if you want page numbers in different locations, different margins, different number of columns on different pages. In Word, page properties such as margins, the number of columns of text, and the position and style of page numbers are applied throughout a section of the document. If you want to change any those characteristics in mid-document, then you must insert a section break at that point in the document.
Page Layout tab > Breaks >
Section Breaks - Next Page or Section Breaks - Continuous to create a section break.
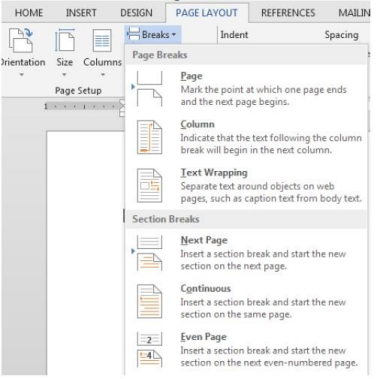
Use Next Page if you want the new section to start on a new page.
Use Continuous if you want a special section in the middle of a page.
You might find that additional sections are needed within the body of your work. If you have a wide table that can only be displayed properly with a landscape page orientation, then you put section breaks before and after the table so that the section including the table can be switched to landscape mode without affecting other parts of the document.
Be careful putting in section breaks – when you delete the break, the properties of the page following the section break flow up through the document so you could end up with all landscape pages.
Stay away from Odd Page and Even Page section breaks unless you need a new chapter to always start on an odd page number (or something like that).
Styles
A style is a collection of format settings that can be applied collectively to paragraphs or characters. For example, instead of manually formatting a paragraph to have the indentation, line spacing, font, borders, and other characteristics that you desire, you can achieve the same effect by applying a pre-defined style that embodies those characteristics.
Why use styles?
❖ Consistency: By using styles, you can ensure that formatting is consistently applied throughout a document or between documents.
❖ Efficiency: You can control formatting more easily because the format for all parts of a document to which a style has been applied can be adjusted simply by changing the style. You can reformat a document to improve its appearance or to meet the requirements of a supervisor or specific publisher by modifying the style instead of manually modifying the appearance of several paragraphs.
❖ Automation: You can use styles to help automate the creation of document features such as a table of contents.
❖ Navigation: In addition to using the automatically generated table of contents for navigation, you will be able to use the Navigation Pane to click on a heading to go to that section of the document. You will also be able to browse by heading using the Browse Object button in the lower right corner of your right scroll bar.
How are styles applied?
There are multiple ways to determine the styles being used in a document and to apply your preferred style to specific parts of the document.
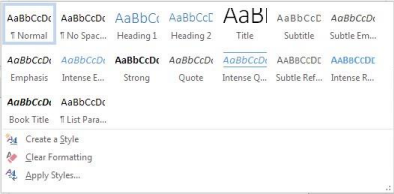
Home ribbon.
The Styles area of the Home ribbon looks something like this:

Some of the most commonly used styles are immediately available from this Quick Style Gallery. You can change the style by clicking on the new style in the group.
Preview: If you simply move your mouse cursor over a style box, then the current paragraph will be displayed in that style. Moving the mouse over a different box will alter the displayed style. Only by clicking on a box will the actual style of the paragraph change. Move your mouse cursor away from the Styles area to display the actual style of the current paragraph.
More styles: Only a few of the available styles can be displayed in the ribbon at one time. To see and perhaps select one of the other styles in the Quick Style Gallery, you can do either of two things: (1) Use the scroll arrows to scroll through the complete set of available styles or (2) use the drop-down arrow to expose the complete Gallery at one time, as shown below:
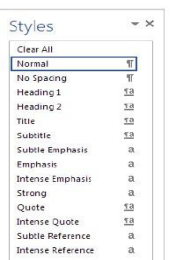
Styles Pane
You can open the Styles pane by clicking on the dialog launch button in the lower right corner of the Styles group of the Home ribbon. The Styles pane itself will look something like the picture above.
The style of the current paragraph will be outlined in the Styles pane. Choose a different style for the current paragraph by selecting it from the list of styles in the Styles pane.
Moving your mouse cursor over a style in the Styles pane will not affect the display of the current paragraph, but you will see a list of the properties for the style. If you click the “Show Preview” check box, then each style in the list will exemplify its format properties.
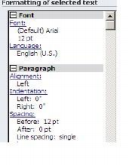
Press Shift F1 to reveal the formatting for the current paragraph.
Click on the button under the Home tab to see tabs, section breaks, page breaks, etc.
Styles Activity: Select and Modify a Style
1. Click in a heading paragraph so your cursor is in there but no letter is selected.
2. Under the Home tab, choose a heading style from the Style group.
3. To modify a heading’s appearance, right click on the Heading name and choose Modify.
4. Make changes to font, font size, boldness, text color, justification as desired. More advanced format options are available under the Format button.
5. Click on OK. All of the headings with this number will now display the new appearance.
STYLE SET
Several styles can be grouped together in a style set. Ideally, the styles in one set would be sufficient to format a document completely. One fast way to reformat your document would be to switch from one style set to another.
For example, you might have one style set designed to meet the formatting specifications of each journal where you hope to publish a paper. If you are turned down by one journal, then preparing your paper for another journal would be just a matter of changing styles sets.
You can experiment with Word’s built-in style sets by selecting a different style set from the Design ribbon. You’ll see a list of the style sets available to you, as shown below. As you move your mouse cursor over each style set in the menu, you will see a live preview of that style set. Click on the style set that you prefer.
Themes
Themes work in tandem with styles or style sets to control the appearance of your document, more in the realm of document design than document formatting. Each theme provides a carefully chosen palette of colors and a small set of fonts that are selected to blend harmoniously in your document.
Fonts
Click on the Font command under the Design tab. Fonts, move your mouse cursor over each of the built-in themes. Your document’s appearance will change to reflect that theme (live preview). Click on the font theme you prefer. The default theme is Office: Calibri or Normal text and Calibri Light for Headings
Color
Click on the Change Styles button under the Home tab. Under Colors, move your mouse cursor over each of the built-in themes. Your document’s appearance will change to reflect that theme (live preview). Click on the color theme you prefer. You can create a custom color theme.
Create a Table of Contents from Heading Styles
If you used heading styles, it is easy to automatically create a table of contents that can be easily updated later.
1. Go to the page where you wish to create your table of contents.
2. Click on the Reference tab.
3. Click on the Table of Contents button.
4. Choose Custom Table of Contents from the list below the built-in choices
5. Change the number of levels and tab leader if you wish.
6. Click OK.
You will see something like:
Using the Navigation Pane
If you used headings in your document, click on the View tab. Check the box next to Navigation Pane
Click on a heading on the left to go to that part of your document.
There is a Pages tab for viewing page thumbnails
And a Results tab where you can search for text in your document and view results.
You can also enter search text in the top box and it will display or highlight pages that have that text on it. Click on the X in the right edge of the search box or press your Esc key to leave your search and return to your document.
Word Keyboard Shortcuts
Bold = Ctrl B
Center a paragraph = Ctrl E
Copy = Ctrl C
Cut = Ctrl X
Exit = Alt F4
Find = Ctrl F
Go to a certain page = Ctrl G (or F5) Go to beginning of line = Home
Go to beginning of document = Ctrl Home Go to end of line = End
Go to bottom of last page = Ctrl End Hanging Indent = Ctrl T
Help = F1
Italicize = Ctrl I
Open = Ctrl O
Paste = Ctrl V
Print = Ctrl P
Print Preview = Ctrl F2
Replace = Ctrl H
Right Align paragraph = Ctrl R
Save = Ctrl S
Save As = F12
Select word = double click on it
Select paragraph = triple click in it Select All text in document = Ctrl A Spell Check = F7
Undo = Ctrl Z
View Paragraph Formatting = Shift F1