Lync 2013
Lync 2013 Guide
The Lync Window
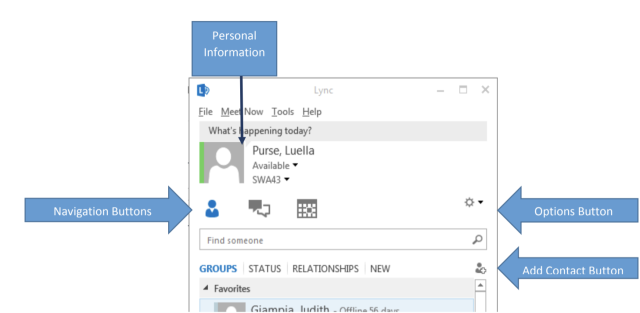
Personal Information – access your personal note, location and presence status. Navigation Buttons – switch between views.
Options Button – access the File Menu and other settings.
Add Contact Button – add contacts in your organization.
Signing In
You can sign into your Lync account directly by opening the program from your desktop or Start screen.
1. Enter your email address in the Sign in address: box.
2. Enter your password in the Password: box.
3. Click the Sign in button.
Setting your Presence Status
If you use Outlook, your status is automatically adjusted to reflect your Outlook Calendar meetings and appointments. You can also manually set the online availability you wish to display to your contacts.
- Click the Status arrow to open the status options. You can select:
- Available: You are online and free to talk.
- Busy: You are busy but can still receive conversation alerts.
- Do Not Disturb: Only alerts from your Workgroup contacts will appear.
- Be Right Back: You have stepped away and will return soon.
- Off Work: You are not at work.
- Appear Away: Your computer is set to away.
- Optional: To return to your previous status, select Reset Status.
Adding a Personal Note
You can add a custom note to instantly share a short message or additional details with your contacts.
- In the What’s happening today? Conversation box, enter a short personal note you would like to share with your contacts.
- Optional: To change your personal note, delete your current message and press the Enter key. Type a new personal note in the space.
Setting your Location
Along with your presence status and personal note, you can also display your current location to your contacts.
- Click Set your Location.
- Enter a description of your current location into the box.
- Click outside the text box to save the location.
Adding a User Picture
Choose a picture of yourself to display to your contacts. The maximum size of a user picture is 30 KB.
- Click the arrow beside the Options
- Click Tools.
- Select Options from the drop-down menu.
- Select My Picture in the left pane of the Lync Options screen.
- Click Edit or remove picture.
- Click Browse and select a photo from your files.
- Click Open.
- Click Save.
- Optional: To hide your picture, click the button Hide my picture. Click OK to confirm.
Navigating in Lync

When you open the Lync main window, you can click the view buttons under your personal information to change your view. Select the view that displays the features you want to access.
- Contacts view: your default view, which displays your various contact groups and their current presence status and network.
- Conversation’s view: displays past chats, meetings, and calls. Contacts
It is important to populate your list of contacts with the people you wish to interact with. You can add contacts using the name, email address, or phone number of another Lync user in your organization.
Adding a Contact from your Organization
- Enter the name, email address, or phone number of a contact you wish to add in the Find someone space in the main Lync window.
- When a desired contact appears, right-click on the name of the user.
- Select Add to Contact List from the drop-down menu.
- Select a group for your contact to belong to. The contact will appear in the desired list.
Creating a New Contact Group
- Click the Add a Contact button.
- Select Create a New Group.
- The new group will appear in your groups view. Click in the blue highlighted New Group space to enter in a name for your group.
- Click and drag contacts to place them into the new group.
- Optional: To delete a group, right click on the group and select Delete Group.
- Optional: To expand a contact group and view contacts, click the Arrow button.
Messaging
Using the Quick Lync Bar
The Quick Lync bar gives you instant access to common tools for interacting with contacts.
- To open the Quick Lync bar, hover your pointer over the user picture of the contact with whom you wish to interact.
- Click one of the Quick Lync buttons to interact with the user, including:
- Send an IM
- See Contact Card
- More
Sending an Instant Message
- Double-click on the contact your wish to instant message in your Contacts List or click the IM button on the Quick Lync menu.
- Type your message into the text box provided and press the Enter key to send.
- Optional: To change the font type, size, or color of your message text, click the Font button. Select a text color from the palette or click the arrows on the Font or Font Size boxes.
- Optional: To insert an emotion, click the Smiley button. Select the desired expression from the palette.
- Optional: To set the importance level of the message to high, click the Set high importance for this message button.
- Optional: To invite a contact to an ongoing conversation, hover over the Participants button. Select a recent contact or click Invite More People to choose from your contacts.
- Click the Close x button when you have finished the conversation. Meetings
With Lync, you can schedule and participate in online meetings with other contacts in your organization. To use Lync meetings optimally, you will need to use Microsoft Outlook.
Scheduling a Meeting in Lync
1. In your Lync window’s Contact view, right-click the contact with which you wish to schedule a meeting.
2. Click Schedule a Meeting.
3. When the Outlook window opens, enter the details of the meeting such as Subject, Location, Start time, End time, and any agenda information in the body space.
4. Click the Send button.
Scheduling a Meeting with you Outlook Calendar
1. Open your Microsoft Outlook program.
2. Click on the Calendar. Click the New Lync Meeting 3. Enter the email address of the contacts you wish to invite.
4. Enter a Subject, Location, Start time, End time, and any agenda information in the body space.
5. Click Send.
Joining a Scheduled Meeting
1. Open the meeting request or reminder.
2. Click Join Lync Meeting.
∙ Call me at: Enter a phone number to dial-in to a conference or select a set number from your Phones options.
Participating in a Meeting
1. Once you have joined a meeting, you do one of the following options: ∙ To view information on other attendees, view the participant list. ∙ To chat in a meeting, enter your instant message into the message space at the bottom of the screen.
∙ To exit a meeting, click the More button. Select End Meeting from the Pop-up menu. Click OK. (If you are not the presenter, simply close the conversation window. The meeting will go on without you.)
Adding Users to a Meeting
Once in a meeting, a presenter can add additional users as needed.
1. In the meeting window, click the Invite More People button.
2. Select additional contacts from the list or enter the name of a contact in the search bar.
3. Click OK.
Presenting Content through Lync Meetings
One of the most powerful features in Lync is the ability to directly present content to your contacts. You train new employees in shared programs or present ideas directly with a PowerPoint presentation. You can choose to share your entire desktop display or just a specific program you're working in. You can also share during individual conversations as well as in meetings.
1. In a meeting, hover your mouse over the Present button.
2. From here, you can share one of the following:
∙ Desktop: displays your entire desktop screen.
∙ Program: Displays work in a selected program.
∙ Q&A: displays other attendees’ questions for you or a presenter to answer.
∙ Whiteboard: displays a writing slate.
∙ Poll: displays a poll that your contacts can participate in.
3. Optional: To give your participants control over the screen, click the Give Control on the sharing toolbar at the top of the screen. Take Back Control on the screen by clicking Take Back Control.
4. Click Stop Presenting to end the sharing session and return to your private screen.
Sharing an Attachment
You can share folders or files with your contacts by attaching them through an instant message or in a meeting.
1. In a meeting or conversation window hover your mouse cursor over the Present button.
2. Click on the Attachments tab.
3. Click the Add Attachments button.
4. Select the file you wish to share in your computer’s folders. 5. Click Open.
6. The attachment file will appear in the Attachments window. From here, you can do one of the following:
∙ To share the attachment in the conversation or meeting window, click Open.
∙ To set who can download the attachment in a meeting, click the arrow beside the Permissions button. Select Organizer if you want to be the only one with access to the file. Select Presenters if you would like to give access to other presenters. Choose Everyone if you would like to give everyone access to the file.
Downloading Meeting Content
You can save content such as polls or questions and answers presented in a meeting for future reference.
1. In a meeting conversation window, hover your mouse cursor over the Present button.
2. Click Manage Presentable Content.
3. Click More.
4. Select Save As or Save with Annotations to download the content to your computer’s folders.
EXTRAS
Organizing your Contacts
By default, Lync will load in your Contacts view. You can further navigate your Lync features by clicking on one of the specific views available to display your contact’s recent activity.
∙ Groups: View your contacts by group.
∙ Status: View your contacts by their availability status.
∙ Relationships: View your contacts by your relationship access to them, such as a family or workgroup.
∙ New: View your contacts list by who has added you most recently. Shortcuts
Conversation Shortcuts
Help………………………………………………………………………………………F1 View in Full Screen………………………………………………………………..F5 Exit Full Screen……………………………………………………………………..Esc
Close Conversation Window…………………………………………………Alt + F4 Accept Invite…………………………………………………………………………Windows key + A Decline Invite………………………………………………………………………..Windows Key + Esc Cut………………………………………………………………………………………..Ctrl + A Paste……………………………………………………………………………………..Ctrl + X Copy………………………………………………………………………………………Ctrl + C Undo……………………………………………………………………………………..Ctrl + Z Redo………………………………………………………………………………………Ctrl + Y